ALTA BLISS Surface Mounted Wall Switch Mode d'emploi
PDF
Documento
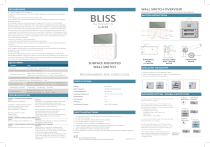
SET LOWER LIMIT
CHANNEL OPTIONS
SELECT A CHANNEL
a. Press “-” button on the wall
switch to select a lower channel.
b. Press “+” button on the wall
switch to select a higher channel.
HIDE UNUSED CHANNELS
a. Press and Hold (about 3 sec)
“-” and “+” buttons simultaneously until wall switch displays “C”
(channel).
b. Press “-” or “+” button to select
required quantity of channel
(between 1 to 15).
c. Press “Stop” button to conńrm
selection (the example shows a
5-channel selection). The LED will
display “O” (O.) once to conńrm
selection.
Action on
Wall Switch
a. Press “Down” button to lower
the shade, then press “Stop” button
when it is in the desired lower limit.
b.
a.
Lower
Channel
Higher
Channel
b. Press and hold (about 5 sec)
“Down” and “Stop” buttons
simultaneously until motor jog x2
and beep x3.
Wall Switch
Response
Action on
Wall Switch
a.
+
Lower
Channel
ADJUST THE UPPER LIMIT
a. Press and hold (about 5 sec) “Up”
and “Stop” buttons simultaneously
until motor jog x1 and beep x1.
b.
Lower
Channel
or
b. Use “Up” button to raise the
shade to the desired highest
position, and use “Up” or “Down”
button to do the ńnal adjustment iI
necessary.
Higher
Channel
c. Press and hold (about 5 sec) “Up”
and “Stop” buttons simultaneously
until motor jog x2 and beep x3.
c.
a. Press and hold (about 5 sec)
“Down” and “Stop” buttons
simultaneously until motor jog x1
and beep x1.
Stop
b. Use “Down” button to lower the
shade to the desired lowest position,
and use “Up” or “Down” button to
do the ńnal adjustment if necessary.
GETTING STARTED
c. Press and hold (about 5 sec)
“Down” and “Stop” buttons
simultaneously until motor jogs x2
and beeps x3.
It is important to conńm tKat tKe motor is aZaNe and ready to receiYe programming. To do
tKis press ùP1ú button on tKe motor less tKan 1 sec to actiYate tKe motor Irom Sleep Mode.
1. PAIR / UNPAIR WALL SWITCH
a. Press “P1” button (about 2 sec)
on the motor head until motor jog
x1 and beep x1.
b. In the next 10 secs, press and
hold “Stop” button on the wall
switch until motor jog x2 and
beep x3.
* Repeat the same procedure to
unpair wall switch.
Action on
Motor
a.
P1
Action on
Wall Switch
Beep x1
Jog x1
b.
Stop
Motor
Response
Jog x2
Beep x3
Action on
Wall Switch
If you need to reverse the direction,
press and hold (about 2 sec) “Up”
and “Down” buttons simultaneously
until motor jog x1 and beep x1.
Motor
Response
Up
+
Down
Jog x1
Beep x1
*The operation is only valid when there are no limits. If the motor has already set the
upper and lower limit, then you can only switch direction by pressing “P1” button
(about 10 sec) on the motor head until motor jog x3 and beep x3.
a. Press “Up” button to raise the
shade, then press “Stop” button
when it is in the desired upper limit.
b. Press and hold (about 5 sec) “Up”
and “Stop” buttons simultaneously
until motor jog x2 and beep x3.
Action on
Wall Switch
Motor
Response
a.
b. Press and hold (about 2 sec)
one “P2” button on the back of
wall switch until motor jog x1 and
beep x1.
Action on
Wall Switch
Beep
x3
Jog x2
Factory Mode Complete
User Mode Begins
a.
Action on
Wall Switch
Jog x1
Motor
Response
SEND SHADE TO FAVORITE
POSITION
Action on
Wall Switch
Press and hold (about 2 sec)
“Stop” button, motor will move to
Favorite position.
Shade
Response
Up
Jog x2
+
Stop
b. Press and hold (about 2 sec)
“Stop” button until motor jog and
beep x1.
Beep
x3
c. Once more, press and hold
(about 2 sec) “Stop” button until
motor jog x1 and long beep x1.
Action on
Wall Switch
a.
b.
+
Down
c.
c. On the New wall switch, press
and hold (about 2 sec) one “P2”
button until motor jog x2 and
beep x3.
*Repeat the same procedure to
remove additional wall switch.
Stop
Beep x3
Jog x2
Motor
Response
a. On the current wall switch,
press and hold (about 2 sec) one
“P2” button until motor jog x1 and
beep x1.
b. Once more, on the current wall
switch, press and hold (about 2 sec)
one “P2” button until motor jog x1
and beep x1.
Beep
x1
+
Down
Down
Stop
Jog x1
Down
Jog x1
Motor Response
b.
Action on
Wall Switch
Stop
Motor Response
Jog x2
Beep x3
a.
Action on
Wall Switch
+
Up
Motor Response
Down
Jog x1
b.
Action on
Wall Switch
Stop
Motor Response
Jog x1
Beep x1
Action on
Wall Switch
a.
P2 Buttons
Motor
Response
Action on
Wall Switch
Current Wall Switch
b.
Jog x1
P2 Buttons
Jog x1
Beep x1
c.
Current Wall Switch
Beep x1
New Wall Switch
P2 Buttons
Jog x2
Motor
Response
Beep x3
NEW WALL SWITCH CONTROL
a.
Up
b.
or
P2 Buttons
Down
Jog x1
Beep x1
c.
Follow instructions under the section 1. Pair / Unpair Wall Switch
8. ADJUST MOTOR SPEED
or
d.
INCREASE MOTOR SPEED
a. Press one “P2” button until motor
jog x1 and beep x1.
b. Press “Up” button until motor jog
x1 and beep x1.
Stop
Stop
Jog x1
Jog x2
Beep x1
Beep x3
c. Once more, press “Up” button
until motor jog x2 and beep x1.
or
a.
DECREASE MOTOR SPEED
a. Press one “P2” button until motor
jog x1 and beep x1.
b.
P2 Buttons
Action on
Wall Switch
a.
Motor
Response
Action on
Wall Switch
Stop
Jog x1
Jog x1
Beep x1
Beep x1
b. Press “Down” button until motor
jog x1 and beep x1.
c. Once more, press “Down” button
until motor jog x2 and beep x1.
Action on
Wall Switch
Jog x1
Jog x1
Beep x1
Beep x1
Up
Jog x2
Beep x1
a.
P2 Buttons
Stop
Beep x1
*If the motor has no response, it
already has a Maximum or Minimum
speed.
Motor
Response
b.
Down
Jog x1
Beep x1
c.
Down
c.
Jog x1
b.
c.
Motor
Response
Action on
Wall Switch
P2 Buttons
Up
Motor
Response
Stop
Motor
Response
Action on
Wall Switch
+
Up
7. ADD OR REMOVE ADDITIONAL WALL SWITCH
Beep x3
USING CURRENT WALL SWITCH
Motor
Response
Action on
Wall Switch
a.
Action on
Wall Switch
Stop
Jog x2
Motor
Response
Action on
Wall Switch
SHEER SHADE MODE - Allows Ior
slight adMustment aIter a short
press and raising/ lowering oI
shade aIter a longer press.
a. Press and hold (about 5 sec)
“Up” and “Down” buttons
simultaneously until motor jog x1.
b. Press and hold (about 2 sec)
“Stop” button until motor jog x1
and beep x1.
+
Up
Motor
Response
Action on
Wall Switch
Up
Beep
x1
c.
Motor
Response
Action on
Wall Switch
Stop
6. ROLLER MODE AND SHEER MODE
ROLLER SHADE MODE DeIault
mode allows Ior continuous
raising/lowering oI shade aIter
a short press.
a. Press and hold (about 5 sec)
“Up” and “Down” buttons
simultaneously until motor jog x1.
b. Press and hold (about 2 sec)
“Stop” button until motor jog x2
and beep x3.
b.
+
Up
Motor
Response
d. Once more, press and hold
(about 2 sec) “Stop” button until
motor jog x2 and beep x3.
a. Press and hold (about 2 sec) one
“P2” button until motor jog and
beep x1.
b.
Up
a. Use “Up” or “Down” button to
move the shade to desired Favorite
position.
DELETE FAVORITE POSITION
3. SETTING THE UPPER AND LOWER LIMITS
SET UPPER LIMIT
SET FAVORITE POSITION
c. Press and hold (about 2 sec)
“Stop” button until motor jog x1
and beep x1.
2. CHANGE MOTOR DIRECTION (IF NECESSARY)
Press “Up” or “Down” button to
check if the shade moves in the
desired direction.
Stop
5. FAVORITE POSITION
P1
P1
Motor
Response
+
Down
Motor
Response
ADJUST THE LOWER LIMIT
Wall Switch
Response
*Honeycomb /Cellular and
Horizontal Blind Motors
DO NOT BEEP.
b.
Down
4. ADJUST LIMITS
Higher
Channel
Wall Switch
Response
Action on
Wall Switch
a.
*If you exit the limit setting status before you ńnish the
limit settings, the motor will take the previous existing
limits.
Wall Switch
Response
Action on
Wall Switch
Action on
Wall Switch
Jog x2
Beep x1
Jog x1
Beep x1
a.
Action sur
l’interrupteur
a. Appuyez le bouton « Bas » pour
abaisser le store, ensuite appuyez le mural
bouton « Arrêt » lorsque le store est
dans la limite inférieure désirée.
Réponse du
moteur
b. Appuyez et maintenez (environ
5s) les boutons « Bas» et « Arrêt
» simultanément jusqu’à ce que le
moteur secoue x2 et bip x3.
*Si vous sortez du réglage des limites avant que vous
terminer le réglage, le moteur prendra les limites
existantes précédentes.
RÉGLER LA LIMITE INFÉRIEURE
OPTIONS DE CANAL
SÉLECTIONNER UN CANAL
a. Appuyez le bouton « - » sur
l’interrupteur mural pour
sélectionnez un canal plus bas.
a.
Action sur
l’interrupteur
mural
b. Appuyez le bouton « + » sur
l’interrupteur mural pour
sélectionnez un canal plus haut.
Réponse de
l’interrupteur
mural
CACHER LES CANAUX NONUTILISÉS
a. Appuyez et maintenez (environ
3s) les boutons « - » et « + »
simultanément jusqu’à ce que
l’interrupteur mural montre
« C » (canal).
b. Appuyez le bouton « - » ou
« + » pour sélectionnez la quantité
de canaux requise (entre 1 et 15).
c. Appuyez le bouton « Arrêt » pour
conńrmer la sélection (l’exemple
montre une sélection de 5 canaux).
La lumière LED montrera « O » (OK)
pour conńrmer la sélection.
b.
Canal
plus bas
a.
Action sur
l’interrupteur
mural
Canal
plus haut
+
Canal
plus bas
Réponse de
l’interrupteur
mural
AJUSTER LA LIMITE SUPÉRIEURE
a. Appuyez et maintenez (environ
5s) les boutons « Haut » et « Arrêt
» simultanément jusqu’à ce que le
moteur secoue x1 et bip x1.
b.
Action sur
l’interrupteur
mural
b. Utilisez le bouton « Haut » pour
soulever le store à la position la plus
haute désirée, et utilisez les boutons
« Haut » ou « Bas » pour faire un
ajustement ńnal si nécessaire.
Canal
plus bas
Canal
plus haut
Réponse de
l’interrupteur
mural
c. Appuyez et maintenez (environ
5s) les boutons « Haut » et « Arrêt
» simultanément jusqu’à ce que le
moteur secoue x2 et bip x3.
c.
Action sur
l’interrupteur
mural
AJUSTER LA LIMITE INFÉRIEURE
a. Appuyez et maintenez (environ
5s) les boutons « Bas » et « Arrêt
» simultanément jusqu’à ce que le
moteur secoue x1 et bip x1.
Arrêt
Réponse de
l’interrupteur
mural
b. Utilisez le bouton « Bas » pour
abaisser le store à la position la plus
basse désirée, et utilisez les boutons
« Haut » ou « Bas » pour faire un
ajustement ńnal si nécessaire.
POUR COMMENCER
C’est important de conńrmer Tue le moteur est réveillé et pr¬t pour la programmation. Pour Iaire cela
appuyez le bouton « P1 » sur le moteur pendant moins de 1 seconde pour activer le moteur du mode veille.
1. COUPLER / DÉCOUPELR L’INTERRUPTEUR MURAL
*Les moteurs pour alvéolés/cellulaires et pour stores horizontaux
N’ÉMETTENT PAS DES BIPS.
a. Appuyez le bouton « P1 »
(environ 2s) sur la tête du moteur
jusqu’à ce que le moteur secoue x1
et bip x1.
b. Dans les prochaines 10 secondes,
appuyez et maintenez le bouton
« Arrêt » sur l’interrupteur mural
jusqu’à ce que le moteur secoue x2
et bip x3.
*Répétez la même procédure pour
découpler un interrupteur mural.
Action sur le
moteur
a.
P1
P1
Secoue
x1
Action sur
b.
l’interrupteur
mural
Bip x1
Arrêt
Secoue
x2
Réponse du
moteur
Bip x3
2. CHANGER LA DIRECTION DU MOTEUR (SI NÉCESSAIRE)
Appuyez le bouton « Haut » ou
« Bas » pour vérińer si le store
bouge dans la direction désirée.
Action sur
l’interrupteur
mural
Si vous devez inverser la direction,
appuyez et maintenez (environ
2s) les boutons « Haut » et « Bas
» simultanément jusqu’à ce que le
moteur secoue x1 et bip x1.
Réponse du
moteur
Haut
+
Bas
Secoue
x1
b. Appuyez et maintenez (environ
5s) les boutons « Haut » et
« Arrêt » simultanément jusqu’à ce
que le moteur secoue x2 et bip x3.
a.
Action sur
l’interrupteur
mural
Réponse du
moteur
b.
Haut
Haut
Secoue
x2
RÉGLER LA POSITION PRÉFÉRÉE
a. Utilisez le bouton « Haut » ou «
Bas » pour placer le store dans la
position préférée désirée.
+
a.
Action sur
l’interrupteur
mural
Réponse du
moteur
c.
Action sur
l’interrupteur
mural
Réponse du
moteur
a.
Action sur
l’interrupteur
mural
Réponse du
moteur
c.
Action sur
l’interrupteur
mural
Réponse du
moteur
Secoue
x2
Bip x3
Mode de l’usine complète
Mode de l’utilisateur commence
b.
+
Haut
Arrêt
Secoue
x1
Haut
Bip x1
+
Haut
Arrêt
Secoue
x2
b.
Bip x1
+
Bas
Bas
Arrêt
Secoue
x1
Arrêt
Secoue
x2
Réponse du
moteur
c. Appuyez et maintenez (environ
2s) le bouton « Arrêt » jusqu’à ce
que le moteur secoue x1 et bip x1.
c.
Action sur
l’interrupteur
mural
d. Une dernière fois, appuyez et
maintenez (environ 2s) le bouton
« Arrêt » jusqu’à ce que le moteur
secoue x2 et bip x3.
Réponse du
moteur
Arrêt
Bip x3
SUPPRIMER LA POSITION
PRÉFÉRÉE
a. Appuyez et maintenez (environ
2s) un bouton « P2 » jusqu’à ce que
le moteur secoue et bip x1.
Bip x3
b. Appuyez et maintenez (environ
2s) le bouton « Arrêt » jusqu’à ce
que le moteur secoue et bip x1.
c. Une dernière fois, appuyez et
maintenez (environ 2s) le bouton
« Arrêt » jusqu’à ce que le moteur
secoue x1 et fait un long bip x1.
Action sur
c.
l’interrupteur
mural
Réponse du
moteur
a.
MODE DE STORE TRANSLUCIDE
– Permet à un ajustement précis
après une pression courte et
soulève/abaisse le store après
une pression longue
a. Appuyez et maintenez (environ
5s) les boutons « Haut » et « Bas
» simultanément jusqu’à ce que le
moteur secoue x1.
b. Appuyez et maintenez (environ
2s) le bouton « Arrêt » jusqu’à ce
que le moteur secoue x1 et bip x1.
Action sur
l’interrupteur
mural
Réponse du
moteur
Action sur
l’interrupteur
mural
Réponse du
moteur
a.
+
Haut
Bas
Secoue x1
b.
Arrêt
Secoue
x2
Bip x3
+
Haut
Bas
Secoue x1
b.
Arrêt
Secoue
x1
Bip x1
UTILISER L’INTERRUPTEUR
MURAL ACTUEL
a. Sur l’interrupteur mural actuel,
appuyez et maintenez (environ 2s)
les boutons « P2 » jusqu’à ce que le
moteur secoue x1 et bip x1.
b. Une autre fois, sur l’interrupteur
actuel, appuyez et maintenez
(environ 2s) les boutons « P2 »
jusqu’à ce que le moteur secoue x1
et bip x1
c. Sur le nouveau interrupteur,
appuyez et maintenez (environ 2s)
les boutons « P2 » jusqu’à ce que le
moteur secoue x2 et bip x3.
a.
Action sur
l’interrupteur
mural
Interrupteur mural
actuel
Bouton P2
b.
Secoue
x1
Bip x1
Réponse du
moteur
c.
Action sur
l’interrupteur
mural
Interrupteur mural
actuel
Bouton P2
Secoue
x1
Bip x1
Nouveau interrupteur mural
Bouton P2
Secoue
x2
Bip x3
Réponse du
moteur
PROGRAMMER UN NOUVEAU INTERRUPTEUR MURAL
Bouton P2
Bas
Suivez les instructions sous la section 1. Coupler/découpler une télécommande.
8. AJUSTER LA VITESSE DU MOTEUR
Secoue
x1
Bip x1
ou
d.
Arrêt
Arrêt
Secoue
x1
Bip x1
Secoue
x2
Bip x3
AUGMENTER LA VITESSE DU
MOTEUR
a. Appuyez un bouton « P2 »
jusqu’à ce que le moteur secoue x1
et bip x1.
a.
Action sur
l’interrupteur
mural
b. Appuyez le bouton « Haut »
jusqu’à ce que le moteur secoue x1
et bip x1.
Réponse du
moteur
c. Une dernière fois, appuyez le
bouton « Haut » jusqu’à ce que le
moteur secoue x2 et bip x1.
Action sur
l’interrupteur
mural
ou
b.
Bouton P2
Arrêt
Secoue
x1
Bip x1
Arrêt
Secoue
x1
Bip x1
Secoue
x1
Bip x1
Bouton P2
b.
Haut
Secoue
x1
Bip x1
Secoue
x1
Bip x1
c.
Réponse du
moteur
Arrêt
Réponse du store
Réponse du
moteur
Action sur
l’interrupteur
mural
Réponse du
moteur
Action sur
l’interrupteur
mural
Réponse du
moteur
* Répétez la même procédure pour
enlever un interrupteur
supplémentaire.
b.
ou
Action sur
l’interrupteur
mural
a.
Action sur
l’interrupteur
mural
6. MODE ENROULEUR OU TRANSLUCIDE
MODE DE STORE À ENROULEUR
ô Mode de déIaut permet
un mouvement continue de
soulèvement/abaissement après
une pression courte
a. Appuyez et maintenez (environ
5s) les boutons « Haut » et « Bas
» simultanément jusqu’à ce que le
moteur secoue x1.
b. Appuyez et maintenez (environ
2s) le bouton « Arrêt » jusqu’à ce
que le moteur secoue x2 et bip x3.
7. AJOUTER OU SUPPRIMER DES INTERRUPTEURS
Bip x3
+
Bas
a.
Action sur
l’interrupteur
Haut
mural
b. Appuyez et maintenez (environ
2s) un bouton « P2 » à l’arrière
de l’interrupteur jusqu’à ce que le
moteur secoue x1 et bip x1.
Appuyez et maintenez (environ 2s)
le bouton « Arrêt », le moteur se
déplacera à la position préférée.
3. RÉGLER LES LIMITES SUPÉRIEURES ET INFÉRIEURES
a. Appuyez le bouton « Haut » pour
soulever le store, ensuite appuyez le
bouton « Arrêt » lorsque le store est
dans la limite supérieure désirée.
c. Appuyez et maintenez (environ
5s) les boutons « Bas » et « Arrêt
» simultanément jusqu’à ce que le
moteur secoue x2 et bip x3.
ENVOYER LE STORE À LA
POSITION PRÉFÉRÉE
Bip x1
*Le fonctionnement est seulement valide lorsqu’il n’y a pas de limites. Si le moteur a déjà une
limite supérieure et inférieure, vous pouvez seulement changer de direction en appuyant le bouton
P1 (environ 10s) sur la tête du moteur jusqu’à ce que le moteur secoue x3 et bip x3.
RÉGLER LA LIMITE SUPÉRIEURE
Arrêt
5. POSITION PRÉFÉRÉE
P1
Réponse du
moteur
+
Bas
4. AJUSTER LES LIMITES
Canal
plus haut
ou
b.
Bas
DIMINUER LA VITESSE DU
MOTEUR
a. Appuyez un bouton « P2 »
jusqu’à ce que le moteur secoue x1
et bip x1.
a.
Action sur
l’interrupteur
mural
b. Appuyez le bouton « Bas »
jusqu’à ce que le moteur secoue x1
et bip x1.
Réponse du
moteur
c. Une dernière fois, appuyez le
bouton « Bas » jusqu’à ce que le
moteur secoue x2 et bip x1.
c.
Action sur
l’interrupteur
mural
*Si le moteur n’a aucune réponse,
il a déjà la vitesse maximum ou
minimum.
Réponse du
moteur
Haut
Secoue
x2
Bip x1
Bouton P2
b.
Bas
Secoue
x1
BIp x1
Bas
Secoue
x2
Bip x1
Secoue
x1
BIp x1
">
/
Descargar
Solo un recordatorio amistoso. Puedes ver el documento aquí mismo. Pero lo más importante es que nuestra IA ya lo ha leído. Puede explicar cosas complejas en términos sencillos, responder a tus preguntas en cualquier idioma y ayudarte a navegar rápidamente incluso por los documentos más largos o complicados.
Enlace público actualizado
Se ha actualizado el enlace público a tu chat. Puedes ver y gestionar tus enlaces de chat después del registro aquí.