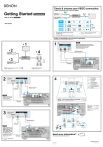
Denon AVR-4310CI Next Generation 7.1 CH A/V Home Theater/Multimedia Multi-Source/Zone Receiver with Networking Guide de démarrage rapide
PDF
Dokument
Check & choose your VIDEO connection.
Getting Started Connections
Mise en route
Vérifiez et choisissez votre connexion VIDEO.
Connexions
AVR- 4310CI
All analog video signals can be converted
to HDMI output.
“Video Conversion Function”
“Function de conversion vidéo”
Tous les signaux analogiques peuvent être convertis à la sortie HDMI.
• Follow 1-3 according to your choice of connection.
• Suivez les étapes 1-3 en fonction de la connexion choisie.
TV
1
1
NOTE
TV
There are multiple ways to connect video.
Please choose the option that is best for you.
VIDEO INPUT
(Read Instruction Manual of your TV set.)
Il y a plusieurs façons d’établir la connexion vidéo.
Veuillez choisir l'option qui vous convient le mieux.
(Lisez le manuel de votre téléviseur.)
2
4
DVD Player
Lecteur DVD
Digital Video and Audio
Audio et vidéo numériques
Speakers
Haut-parleurs
A/V Receiver
3
Récepteur AV
Cable/Satellite
Câble / Satellite
Analog Video
Vidéo analogique
NOTE : For more connection options.
• Cables are NOT included.
REMARQUE : Autres connexions.
2
DVD Player
• Les câbles NE sont PAS compris.
4
VIDEO OUTPUT
Lecteur DVD
Digital
Audio Output
FL : Front Left Speaker
Enceintes avant gauche
FR : Front Right Speaker
Enceintes avant droit
C
: Center Speaker
Enceinte centrale
SL : Surround Left Speaker
Enceintes surround gauche
SR : Surround Right Speaker
Enceintes surround droit
SBL : Surround Back Left Speaker
Enceintes gauche arrière Surround
SBR : Surround Back Right Speaker
Enceintes droit arrière Surround
Digital Video and Audio
SW : Subwoofer
Audio et vidéo numériques
Analog Video
Subwoofer
Vidéo analogique
NOTE
SBL
* Audio connections are
required with analog
video connections.
SBR
NOTE : For Surround back connectivity.
* Les connexions audio sont requises
pour toutes les connexions vidéo.
REMARQUE : Pour la connexion Surround arrière.
Digital Audio
Audio numérique
Cable colors are for illustration
purpose only.
Make sure “q” or “w” marking on
your cable.
3
Les couleurs de câble ne correspondent pas à
la réalité.
Assurez-vous que le signe “q” ou “w” se
trouve sur votre câble.
Cable / Satellite
VIDEO OUTPUT
Câble/Satellite
Digital
Audio Output
Digital Video and Audio
Audio et vidéo numériques
Analog Video
Vidéo analogique
NOTE
* Audio connections are
required with analog
video connections.
* When using component
video cables, change
the assignment of the
terminals to be used
* Les connexions audio sont requises
pour toutes les connexions vidéo.
* Si vous utilisez des câbles vidéo
composante, modifiez l’attribution
des terminaux à utiliser
Digital Audio
Audio numérique
Need more information?
Avez-vous besoin d’autres informations?
“Input Assign”
5431 10088 008D
Printed in Japan
Basic operations
Exploitations de base
Connect the AVR-4310CI to your Network!
Connectez le AVR-4310CI à votre réseau!
ENTER ···················· OK
Follow these simple steps to complete the Internet connection:
Suivez ces quelques étapes pour terminer la connexion Internet :
Cursor buttons ······· Select
Sélectionnez
Connecting via Wired LAN
Listening to Internet Radio
LAN câblé
Cursor buttons ······· Next
Ecouter la radio Internet
Suivant
SOURCE SELECT
button ······················ SOURCE SELECT Menu
SOURCE SELECT supérieur
NOTE:
For details on connections or operation, see the AVR-4310CI Owner’s manual.
REMARQUE : Pour obtenir des détails concernant les connexions ou le fonctionnement, reportez-vous au Manuel d’Utilisation AVR-4310CI.
Connecting via Wired LAN
LAN câblé
1. Connect the LAN cable
Connectez le câble LAN
Broadband router
2. Turn on the AVR-4310CI
Allumez le AVR-4310CI
Routeur à large bande
Listening to Internet Radio
Need more information?
Avez-vous besoin d’autres informations?
Ecouter la radio Internet
*Note that the illustrations in these instructions may
differ from the actual unit for explanation purposes.
*Veuillez remarquer que les illustrations de ce manuel
sont données à titre explicatif et peuvent différer par
rapport à l’unité.
Internet Radio
SOURCE SELECT
Press the SOURCE SELECT button.
The SOURCE SELECT Menu is displayed.
Appuyez sur la touche SOURCE SELECT.
Le menu SOURCE SELECT s’affiche.
Source
Internet Radio
Move
Enter
Recent
Japan
Recommended Stations
Search Stations
Search Podcasts
Recommended Stations
New station
radiodenon.com
New stations
Popular stations
Recently Played
Search
Video
Player
Network
Tuner
[1/7]
Internet Radio
[1/2]
Now Playing
[3/37]
Atomix Radio
Beatfox Radio
00:03
100%
Beatfox Radio Dance
Beatfox Radio Pop
BestRadio Brasil
Cerritos All Stars
CGM UKScene Radio
MEMORY
Favorites
SEARCH
FOO FIGHTERS - MY HERO
BestRadio Brasil
128 kbps
MEMORY
Search
Select “Internet Radio” and press ENTER
Select the item you want, and press
Sélectionnez “Internet Radio” et appuyez sur ENTER
Sélectionnez l’élément désiré, et appuyez sur
Memory
Select
">
/

Herunterladen
Nur eine freundliche Erinnerung. Sie können das Dokument direkt hier ansehen. Aber was am wichtigsten ist, unsere KI hat es bereits gelesen. Sie kann komplexe Dinge einfach erklären, Ihre Fragen in jeder Sprache beantworten und Ihnen helfen, auch in den längsten oder kompliziertesten Dokumenten schnell zu navigieren.