INSTALLATION MANUAL
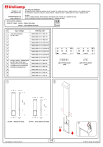
PRODUCT NAME : SKUNA - Bollard Slim Base
SKUNA - Short Bollard Slim Base
Input voltage
No.
1.
2.
IP66
Ordering Code
7848/7849-I/K-3-524-XX
220-240V 50/60Hz
On-off / DALI
7848/7849-I/K-3-867-XX
3.
7848/7849-I/K-3-868-XX
4.
7848/7849-I/K-3/5-523-XX
5.
7848/7849-I/K-3/5-897-XX
6.
7848/7849-I/K-3/5-898-XX
7.
7848/7849-I/K-3/5-567-XX
8.
7848/7849-I/K-3/5-569-XX
9.
7848/7849-I/K-3/5-571-XX
10.
11.
12.
Constant Voltage - Remote driver
On-Off / DALI 24Vdc input
( Output from SELV system only)
( ¡ÃÐáÊ俵ͧÁÒ¨Ò¡Ãкºáç´Ñ¹ä¿¿Ò
µèíÒ¾ÔàÈÉ¢Ñé¹»ÅÍ´ÀÑÂà¾Õ§à·Ò¹Ñé¹)
7848/7849-I/K-7-580-XX
1-6,10-15
7-9
7848/7849-I/K-7-581-XX
Light Emitting Diodes
(LED)
Light Emitting Diodes
(LED)
7848/7849-I/K-7-582-XX
13.
7848/7849-I/K-7-577-XX
14.
7848/7849-I/K-7-578-XX
15.
7848/7849-I/K-7-579-XX
1
2
150
70
70
163
30
SKUNA - Bollard Slim Base
500
700
1000
800
150
163
30
SKUNA - Short Bollard Slim Base
2.1
2.2
Last Revised On : 06/06/2023 REV.02
1/5
FR-DM-17 REV.03 EFF 15/09/17
3
4
Top view .
ÀÒ¾´Ò¹º¹
200mm.
4.3
Concrete
¤Í¹¡ÃÕµ
100mm.
Torque/áçºÔ´ : 1 Nm.
90
°
Cable length 200 mm.
ÊÒÂä¿ÂÒÇ 200 ÁÁ.
For DALI system.
ÊíÒËÃѺÃкºDALI
4.1
4.2
Cable pipe
·ÍÊÒÂä¿
205 mm.
Output
ÍÍ¡ (L)
Input
à¢Ò (L)
L
L
N
5
N
DA2
Click
DA1
NO
A = 50-60 mm.
Cable Size/¢¹Ò´ÊÒÂä¿ : 5x1.00 mm. Ø 7.1 -13 mm.
- The connector has cutting blade inside.
Don’t need to peel off an insulation sheath.
- äÁµÍ§»ÅÍ¡©¹Ç¹ÊÒÂä¿
Installation complete
µÔ´µÑé§àÊÃç¨ÊÁºÙó
For Constant Voltage LED 24V (Remote driver)
Luminaires 1-n
Warning
Please ensure that the led lamp is connected to the driver correctly.
Wrong polarity connection cause a damage to the led lamp and driver.
â»Ã´ÃÐÇѧ¡ÒõÍÊÒÂä¿ÊÅѺ¢ÑéÇ +ºÇ¡ -ź ¨Ò¡ä´ÃàÇÍÃÁÒà¢Ò·ÕèËÅÍ´ LED ËÒ¡µÍÊÅѺ¢ÑéÇ
¨Ð·íÒãËä´ÃàÇÍÃáÅÐËÅÍ´ LED à¡Ô´¤ÇÒÁàÊÕÂËÒÂ
Input/à¢Ò
220-240 V~
Number on the cable/ËÁÒÂàÅ¢º¹ÊÒÂä¿
1 : L
A
2 : N
3 : D1
NO
4 : D2
5:
2
L
AC
N
DC
+
-
+
1
-
+
2
-
+
n
-
Output/ÍÍ¡
24V
( Output from SELV system only)
(¡ÃÐáÊ俵ͧÁÒ¨Ò¡Ãкºáç´Ñ¹ä¿¿Ò
µèíÒ¾ÔàÈÉ¢Ñé¹»ÅÍ´ÀÑÂà¾Õ§à·Ò¹Ñé¹)
Parallel wiring constant voltage
Distance from luminaire to Driver
ÃÐÂзҧ¨Ò¡µÑÇâ¤Á¶Ö§ ä´ÃàÇÍÃ
Luminaire Wattage Maximum number of luminaires
Conductor size / ¢¹Ò´ÊÒÂä¿
for parallel connection /
¨íҹǹâ¤Á㹡ÒõÍẺ¢¹Ò¹
1.00 mm.2
1.50 mm.2
2.00 mm.2
Accessory available separately./ÍØ»¡Ã³àÊÃÔÁ¨íÒ˹ÒÂᡵҧËÒ¡
Ordering Code
Product Name
0648-0-9-000-00 LED Constant Voltage
Driver 24Vdc 72W.
13 W
1-3 luminaires
30 m
50 m
65 m
0445-0-9-000-00 LED Constant Voltage
Driver 24Vdc 150W.
13 W
1-6 luminaires
15 m
25 m
35 m
Last Revised On : 06/06/2023 REV.02
2/5
FR-DM-17 REV.03 EFF 15/09/17
Remark :
ËÁÒÂà˵Ø
Warning :
¢Í¤ÇÃÃÐÇѧ
1. The manufacturer will not be liable or held responsible
for any incorrect installation, misuse or improper use
and unauthorised modification to the fittings. Failure
to comply with mentioned warning may cause serious
damage or serious injury to persons, animals or
objects. If any modification is required please consult
your dealer for the details.
·Ò§¼Ù¼ÅÔµäÁÊÒÁÒöÃѺ¼Ô´ªÍºã¹¤ÇÒÁàÊÕÂËÒÂã´æ·Õèà¡Ô´¨Ò¡¡ÒÃ
µÔ´µÑé§äÁ¶Ù¡ÇÔ¸,Õ ãª§Ò¹¼Ô´»ÃÐàÀ·ËÃ×Í´Ñ´á»Å§µÑÇâ¤Áã¹·Ø¡¡Ã³Õ
«Öè§ ÊÔ觼Դ»¡µÔàËÅÒ¹Õé ÍÒ¨·íÒãËà¡Ô´ÍѹµÃÒ¡Ѻ ¤¹ ÊÑµÇ ÊÔ觢ͧ
ËÒ¡ÁÕ¢ÍʧÊÑÂËÃ×ÍÁÕ¤ÇÒÁµÍ§¡ÒûÃѺᵧµÑÇâ¤Á
ãËàËÁÒÐÊÁ¡Ñº¡ÒÃ㪧ҹ ¡ÃسҵԴµÍµÑÇá·¹¨íÒ˹ÒÂËÃ×ͼټÅÔµ
1. Installation should be carried out by a qualified
electrician in accordance with appropriate national
wiring regulation.
¡ÒõԴµÑé§â¤Áä¿¿ÒáÅÐÍØ»¡Ã³ ¤ÇôíÒà¹Ô¹¡ÒÃâ´ÂªÒ§ä¿¿Ò
·ÕèÁÕ¤ÇÒÁÃÙáÅФÇÒÁªíÒ¹Ò­ 㹡ÒõԴµÑé§ÍØ»¡Ã³ä¿¿Ò
â´Â੾ÒеÒÁÁÒµÃฐÒ¹¢Í§¡ÒÃä¿¿Ò
2. Disconnect the power before changing the lamp.
»´ÊÇÔ·ªä¿·Ø¡¤ÃÑ駷Õèà»ÅÕè¹ËÅÍ´ä¿
3. This is Class1 luminaire, the installation must be
completed with earthing.
â¤Áä¿Ãع¹Õ鶡٠¨Ñ´äÇã¹»ÃÐàÀ·¢Í§¡Òûͧ¡Ñ¹ä¿¿ÒÃÑèÇ ÃдѺ 1
·Õè¨ÐµÍ§µÍÊÒ´ԹµÒÁÁÒµÃฐÒ¹¤ÇÒÁ»ÅÍ´ÀÑÂ
2. Where damage has occured to the fittings, please
make the replacement with standard parts before use.
㹡óշèÁÕ Õªé¹Ô Êǹ»ÃСͺã´à¡Ô´¤ÇÒÁàÊÕÂËÒ¡ÃسÒà»ÅÕ蹪Թé
ÊǹãËÁ¡Í¹¡ÒÃ㪧ҹ·Ø¡¤ÃÑé§ à¾×èͤÇÒÁ»ÅÍ´ÀÑÂ
4. Do not exceed the maximum wattage.
ËÒÁãªËÅÍ´ä¿·ÕèÁÕ¢¹Ò´Çѵµà¡Ô¹¡ÇÒ·ÕèÃÐºØ ËÃ×ÍãªËÅÍ´¼Ô´»ÃÐàÀ·
5. Don't touch LED while maintaining or cleaning.
ËÒÁÊÑÁ¼ÑÊËÅÍ´ LED ¢³ÐºíÒÃاÃÑ¡ÉÒ ËÃ×Í·íÒ¤ÇÒÁÊÐÍÒ´
Cable Size/¢¹Ò´ÊÒÂä¿ : 3x1.00 mm.2 Ø8-10 mm.
In case the supply cable is exposed to sunlight use UV resistant cable.
¡Ã³Õ·ÕèÁÕ¡ÒõԴµÑé§â¤Á俹͡ÍÒ¤Òà ËÃ×Íâ¤Áä¿·ÕèÁÕ¡ÒÃá¼ÃѧÊÕÂÙÇÕ ÊÒÂ俵ͧÊÒÁÒö»Í§¡Ñ¹ ËÃ×Í ÁÕ¡Òûͧ¡Ñ¹äÁã˶١ÃѧÊÕÂÙÇÕä´
NO
0.5 m
Do not touch the LED because it may shorten the life time or the LED can be
breaking down.
ËÒÁÊÑÁ¼ÑÊËÅÍ´ LED â´Âà´ç´¢Ò´ à¾ÃÒШзíÒãËËÅÍ´àÊ×èÍÁÊÀÒ¾
Minimum distance to lighted surface.
ÃÐÂÐËÒ§¢Ñé¹µèíÒ ¨Ò¡Ë¹Òâ¤Á¶Ö§¾×é¹¼ÔÇ·Õ趡٠ÊͧÊÇÒ§
The luminaire should be positioned so that prolonged staring into the luminaire at
a distance closer than 0.5m in not expected.
µíÒá˹§·ÕèµÔ´µÑ駴ǧâ¤Á¤ÇÃÍÂÙ㹨ش·ÕèáʧäÁÊͧà¢Ò´Ç§µÒâ´ÂµÃ§à»¹àÇÅÒ¹Ò¹ ËÒ¡à¢Òã¡Åã¹
ÃÐÂйÍ¡ÇÒ 0.5 Á.
Any damaged safety glass cover must be replaced only with the original
spare part.
àÁ×èÍ¡ÃШ¡à¡Ô´¤ÇÒÁàÊÕÂËÒ à¾×èͤÇÒÁ»ÅÍ´ÀѤÇÃÊÑè§ÍÐäËÅá·¨Ò¡¼Ù¼ÅÔµà·Ò¹Ñé¹
Last Revised On : 06/06/2023 REV.02
3/5
FR-DM-17 REV.03 EFF 15/09/17
NO
Not using chemical compounds and aggressive agents such as , weed
repellents fertilizers , acid solvent and contaminated irrigation water near the
Luminaires.
ËÒÁãªÊÒÃà¤ÁÕહ »ØÂ, ÂÒ¡íҨѴÈѵÃپת, »Ù¹¢ÒÇ, ÊÒÃÅÐÅÒ·Õè໹¡Ã´ áÅÐนําปนเปื อนสารเคมี
ºÃÔàdz·ÕèµÔ´µÑé§â¤Áä¿
Our products are installed with electronic components with the protection against
overvoltage according to IEC 61547. The customers have to install the additional
overvoltage protection devices (against surge, transients, etc) in their electrical
system to avoid the risk of damage. Failing to do so will end the product
warranty.
¼ÅÔµÀѳ±¢Í§àÃÒÁÕ¡ÒõԴµÑé§ÍØ»¡Ã³ÍÔàÅç¡·Ã͹ԡÊÊíÒËÃѺ¡Òûͧ¡Ñ¹áç´Ñ¹ä¿à¡Ô¹µÒÁÁÒµÃฐÒ¹
IEC 61547 áÅÐÅÙ¡¤ÒµÍ§µÔ´µÑé§ÍØ»¡Ã³»Í §¡Ñ¹áç´Ñ¹ä¿à¡Ô¹à¾ÔèÁàµÔÁ (»Í§¡Ñ¹ä¿¡ÃЪҡ
,ä¿¿ÒÅѴǧ¨Ã ÏÅÏ)ã¹Ãкºä¿¿Ò´Ç à¾×èÍËÅÕ¡àÅÕ觤ÇÒÁàÊÕ觷Õè¨Ðà¡Ô´¤ÇÒÁàÊÕÂËÒÂ
ËÒ¡äÁ´íÒà¹Ô¹¡Òôѧ¡ÅÒÇ ¡ÒÃÃѺ»ÃСѹ¨ÐÊÔé¹Êشŧ
LED
Clean the products regularly to maintain good light output and prolong surface
quality .
Only use solvent-free cleaning solutions on the products.
·íÒ¤ÇÒÁÊÐÍÒ´¼ÅÔµÀѳ±à»¹»ÃШíÒà¾×èÍÃÑ¡ÉÒ¤ÇÒÁÊͧÊÇÒ§·Õè´ÕáÅÐÂ×´ÍÒÂؤسÀÒ¾¾×é¹¼ÔÇ
㪹éíÒÂÒ·íÒ¤ÇÒÁÊÐÍÒ´·ÕèäÁÁÕáÍÅ¡ÍÎÍÅËÃ×͵ÑÇ·íÒÅÐÅÒ¡Ѻ¼ÅÔµÀѳ±à·Ò¹Ñé¹
Do not use a high pressure washer to clean the products.
ËÒÁãªà¤Ã×èͧ©Õ´¹éíÒáç´Ñ¹Ê٧㹡Ò÷íÒ¤ÇÒÁÊÐÍÒ´¼ÅÔµÀѳ±
LED
LED
To replace the LED module or the entrire luminaire.Please consult your
sales representative.
ËÒ¡µÍ§¡ÒÃà»ÅÕè¹ LED module ËÃ×Íâ¤Áä¿â»Ã´µÔ´µÍµÑÇá·¹¢Ò¢ͧ¤Ø³
Environmental protection: Waste electrical products should not be disposed of
with household waste. please recycle where facilities exist.check with your local
authority or retailer for recycling advice According to directive 2002/96/CE and
directive 2012/19/EU Waste Electrical and Electronic Equipment (WEEE).
ËÒÁ·Ô駼ÅÔµÀѳ±¹ÕéÃÇÁ¡Ñº¢ÂÐ㹤ÃÑÇàÃ×͹ª¹Ô´Í×è¹æàÁ×èÍÊÔé¹ÊØ´ÍÒÂØ¡ÒÃ㪧ҹâ»Ã´á¡¼ÅÔµÀѳ±ÍÍ¡
¨Ò¡¢Í§àÊÕ»ÃÐàÀ·Í×è¹æáÅÐÃÕä«à¤ÔÅÍÂÒ§àËÁÒÐÊÁà¾×èÍʧàÊÃÔÁ¡ÒùíÒ·ÃѾÂҡáÅѺÁÒ㪫éíÒ«Ö觨ЪÇÂ
»Í§¡Ñ¹ÍѹµÃÒµÍÊÔè§áÇ´ÅÍÁËÃ×ÍÊØ¢ÀÒ¾¢Í§Á¹ØÉ·Õèà¡Ô´¨Ò¡¡Ò÷Ô駢ÂÐâ´ÂäÁÁÕ¡ÒäǺ¤ØÁ
ÍÒ§ÍÔ§µÒÁÃÐàºÕº 2002/96/CE áÅÐÃÐàºÕº 2012/19/EU Waste Electrical and
Electronic Equipment (WEEE).
Last Revised On : 06/06/2023 REV.02
4/5
FR-DM-17 REV.03 EFF 15/09/17
Replacing the LED module
ÇÔ¸Õ¡ÒÃà»ÅÕè¹ LED module
1. Contact your sales representative for replacement LED modules. Make sure that the replacement module
match the initially supplied module. Note the part number printed on the LED module.
àµÃÕÂÁ LED module ã˵ç¡ÑºÃع·ÕèµÍ§¡ÒÃà»ÅÕè¹â´ÂµÃǨÊͺ·ÕèËÁÒÂàÅ¢·Õè¾ÔÁ¾º¹LED modules áÅÐ µÔ´µÍµÑÇá·¹¢ÒÂà¾×èÍÊÑ觫×éÍ
LED modules ·ÕèµÍ§¡ÒÃà»ÅÕè¹
2. The LED module can be replaced by qualified persons using standard tools.
¡ÒÃà»ÅÕè¹ LED module µÍ§·íÒâ´ÂªÒ§¼ÙªíÒ¹Ò­áÅÐãªà¤Ã×èͧÁ×Í·Õèä´ÁÒµÃฐÒ¹
3. Disconnect power before opening the luminaire housing.
µÑ´áËŧ¨ÒÂ信͹·Õè¨Ðà»´µÑÇâ¤Á
4. Replace the old LED module with the new LED module. Reapply thermal interface material as supplied with the
new LED module.
¶Í´ LED module ·ÕèªíÒÃØ´ÍÍ¡ ¨Ò¡¹Ñ¹·íÒ¤ÇÒÁÊÐÍÒ´¨Ø´ÇÒ§ËÅÍ´ áÅǨ֧·íÒ¡ÒûÃСͺ LED module ãËÁ áÅеͧà»ÅÕè¹
á¼¹Thermal Pad ËÃ×Í Thermal Grease ´Ç·ء¤ÃÑé§
5. Inspect gaskets and if required replace with new gaskets. Defective luminaire covers must be replaced. Inspect
correct wiring of replaced LED module.
µÃǨÊͺ»ÃÐà¡ç¹áÅЪÔé¹Êǹ¢Í§µÑÇâ¤Á ¶ÒªíÒÃØ´àÊÕÂËÒÂãË·íÒ¡ÒÃà»ÅÕè¹ãËÁ áÅеÃǨÊͺ¡ÒÃà¢ÒÊÒÂ俢ͧ LED module
·Õèà»ÅÕè¹ãËÁ¶Ù¡µÍ§ËÃ×ÍäÁ
6. Close the luminaire housing before reconnecting power.
»´½Ò¤ÃͺÅçͤâ¤Áä¿ãËàÃÕºÃÍ¡͹໴ä¿
Last Revised On : 06/06/2023 REV.02
5/5
FR-DM-17 REV.03 EFF 15/09/17
">